

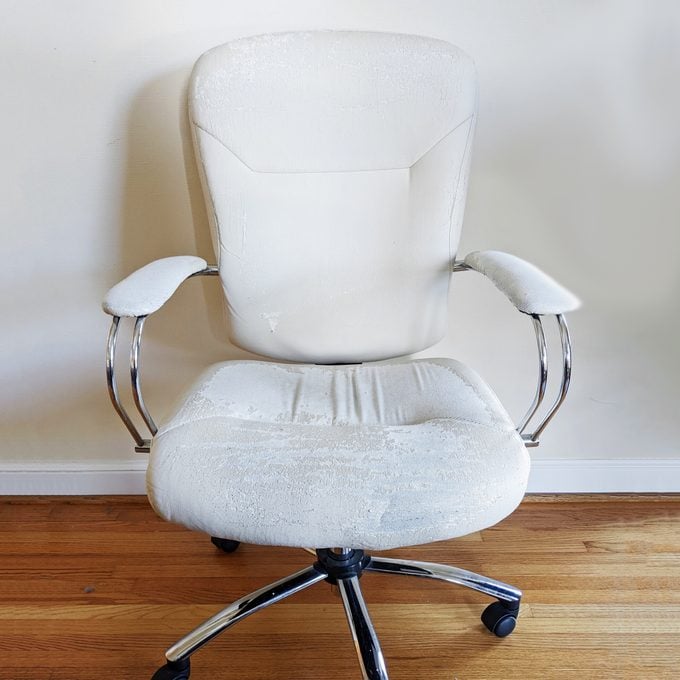
My faux leather office chair was structurally in good shape, but the fabric looked awful. It was cracked, flaking and worn down to the faux leather backing in several spots.
I learned the basics of reupholstering a chair when I re-covered my dining set’s chair seats, and I’m an intermediate sewer. I decided to take the next step and reupholster my office chair instead of tossing out the perfectly good frame.
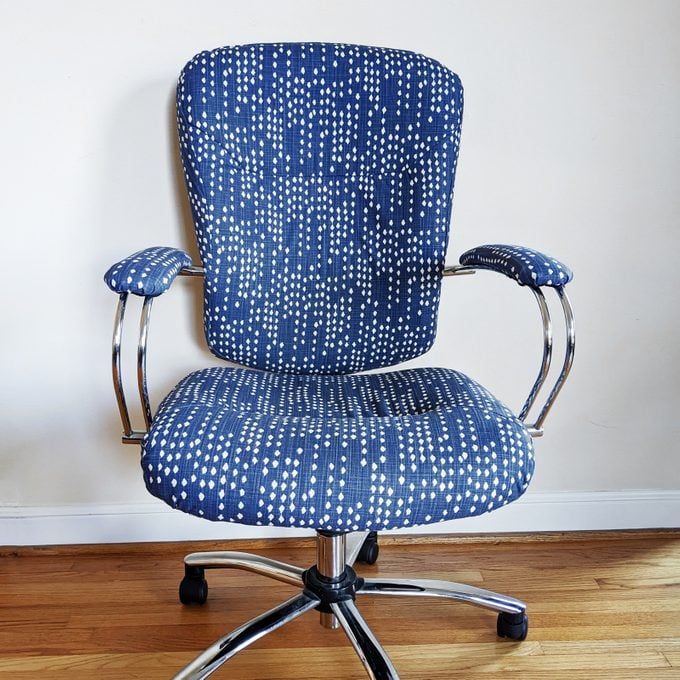
I’m pleased with how it turned out, and what I learned along the way.
On This Page
Is Your Chair Worth Reupholstering?
If you can take the chair apart, the frame is in good shape and you love to sew, consider reupholstering your chair. If not, try a different solution, like buying a slipcover.
My office chair seemed solid, the padding wasn’t overly worn and I could see how the frame was put together. The shapes to sew were straightforward, without built-in pillows or complex pieces. I felt comfortable tackling my chair based on my skill level.
Create an Upholstery Plan

Examine your chair carefully from every angle. Make a rough sketch of the back, seat and arms, drawing every seam and marking which fabric edges attach to the chair frame.
Next, measure each section that’s sewn together at the widest and longest part. Write the measurements on your sketch. This is important: Add a 1/2-inch seam allowance on edges you’ll sew together, and three or four inches on edges you’ll staple to the chair.
This detailed sketch will help you determine how much fabric you need and how to position the pieces on the fabric before cutting.
Disassemble the Chair
With your smartphone, take pictures of your chair from every angle. Then, as you disassemble your chair, take photos to document the process. This will help you remember how components fit together when you reassemble the chair.
I also took photos of each screw and bolt I removed next to the piece it belonged to, to keep the hardware straight.
Expect some surprises
As the chair comes apart, you’ll uncover parts you couldn’t initially see or overlooked. Take photos of these as well.
On my chair, I was surprised to find decorative piping hid staples that held the back cover. I also found cords holding parts of the fabric taut against the back.
Use old pieces as patterns
Once you’ve removed the old fabric, take every piece apart, cutting the threads with a seam ripper or scissors. You can use the old pieces as patterns to cut fabric for your new cover.
Label each old piece with a permanent marker or fabric pen. You’ll presumably throw the old fabric away, so using a marker is no problem.
Select Fabric for Your Chair
Types of upholstery fabric can be divided into two extremely broad categories: fibrous cloth (like polyester or cotton) and leather (faux or real). Those categories can be broken down further, into different types of natural or synthetic cloth, and vinyl or polyurethane faux leather.
Note: Fibrous cloth and leather-like material require different needles for sewing. Be sure you have the correct needle.
Upholstery fabric is usually more expensive than fabric for clothes or quilting, because it’s generally heavier and doesn’t wear out as fast.
Faux leather and cloth upholstery fabric cost about the same, usually starting around $11 to $20 per yard, or 81 cents to $1.25 per square foot. Real leather isn’t as widely available and much more expensive, starting at $5 or $7 per square foot.
Shop around to find the best prices. You don’t have to buy fabric and thread from the same store to get the most bang for your buck. Amazon is typically a few dollars cheaper per yard on the same fabric compared to other national fabric outlets, but Joann Fabrics has better prices on thread.
And don’t forget to check your local fabric stores. One fabric store near me, Treadle Yard Goods, had less selection but comparable prices to Amazon. They also had some fabrics I didn’t see elsewhere.
Notes about patterned fabric

Solid-colored fabric is the easiest to work with because there’s no pattern to match. You must, however, pay attention to the direction of the grain as you cut the fabric.
If you want to use fabric with a pattern, I found vertical elements easiest to line up before cutting out the pieces. (The pattern on my fabric had splotches arranged in vertical lines.) I then snipped a tiny wedge-shaped notch at the edge of each piece of fabric in a spot where they lined up. That made it easy to stack the notches when I was ready to sew.
I also tried to line up the splotches so it looked like the seam went through the center of the design, but I was a little off on the seam placement.
When lining up a pattern, account for the 1/2-inch seam allowance on the edge of each piece of fabric that will be sewn together. When purchasing fabric, look for the vertical and horizontal pattern repeat (i.e. the number of inches it takes before the pattern starts over) on the fabric’s specifications.
When sketching your upholstery plan, add the number of inches it takes for the pattern to repeat to one of the edges you plan to match. This will give you another identical section of the fabric to line up with the piece you previously cut.
Get the Right Tools and Materials
Use a heavy-duty or upholstery thread with whatever fabric or leather you choose.
Get sewing needles meant for the thickness of your thread and the type of fabric you’re using. Your thread should have the recommended needle size on the label. These needles are thicker than typical sewing needles. The needles used with faux and real leather are more knife-like.
You can hand sew, but a sewing machine saves time. I had no problems using an all-purpose presser foot for my chair, although many sewing blogs recommend a walking presser foot for heavy-duty upholstery fabrics. You may need a piping presser foot if your chair has piping (fabric-covered trim that outlines seams). Plan to use a straight stitch.
You also need a heavy-duty staple gun, pliers, a screwdriver and sharp regular or fabric scissors. Get 1/4-in. staples if you have a lightweight fabric or few layers, or 3/8-in. staples if you need to go through several layers, according to Spruce Upholstery.
I also recommend a marker, seam ripper and staple remover. You can take out staples with pliers, but a staple remover is a time-saver.
Smooth Fabric — a Lot!
As I stapled the new cover to the chair frame, I smoothed fabric over the edge of the chair between every staple or two with the palm of my hand. I put a flat palm on the front side of the chair about one-third of the way up the full width of the cushion, pressed down and ran my hand over the fabric around to the back before stapling.
That’s a lot of smoothing. But it ensured the fabric was where I wanted before I stapled it. That gave the chair a more professional-looking appearance than my dining chairs, which I spent less time smoothing.
One Regret
Cutting new fabric along the old fabric’s seam lines was the right move, but I wish I added an extra inch or two on the sides that would be stapled to the chair frame. My new cover fit the chair, but just barely in some spots. I would have liked more wiggle room, and I could have cut off excess fabric once it was stapled in place.
Originally Published: October 24, 2022
Did you miss our previous article…
https://tophouseimprovement.com/how-to/smart-home-security-systems-a-beginners-guide/